Palettes
Summary
Overview
Here is a typical Subs Factory working window.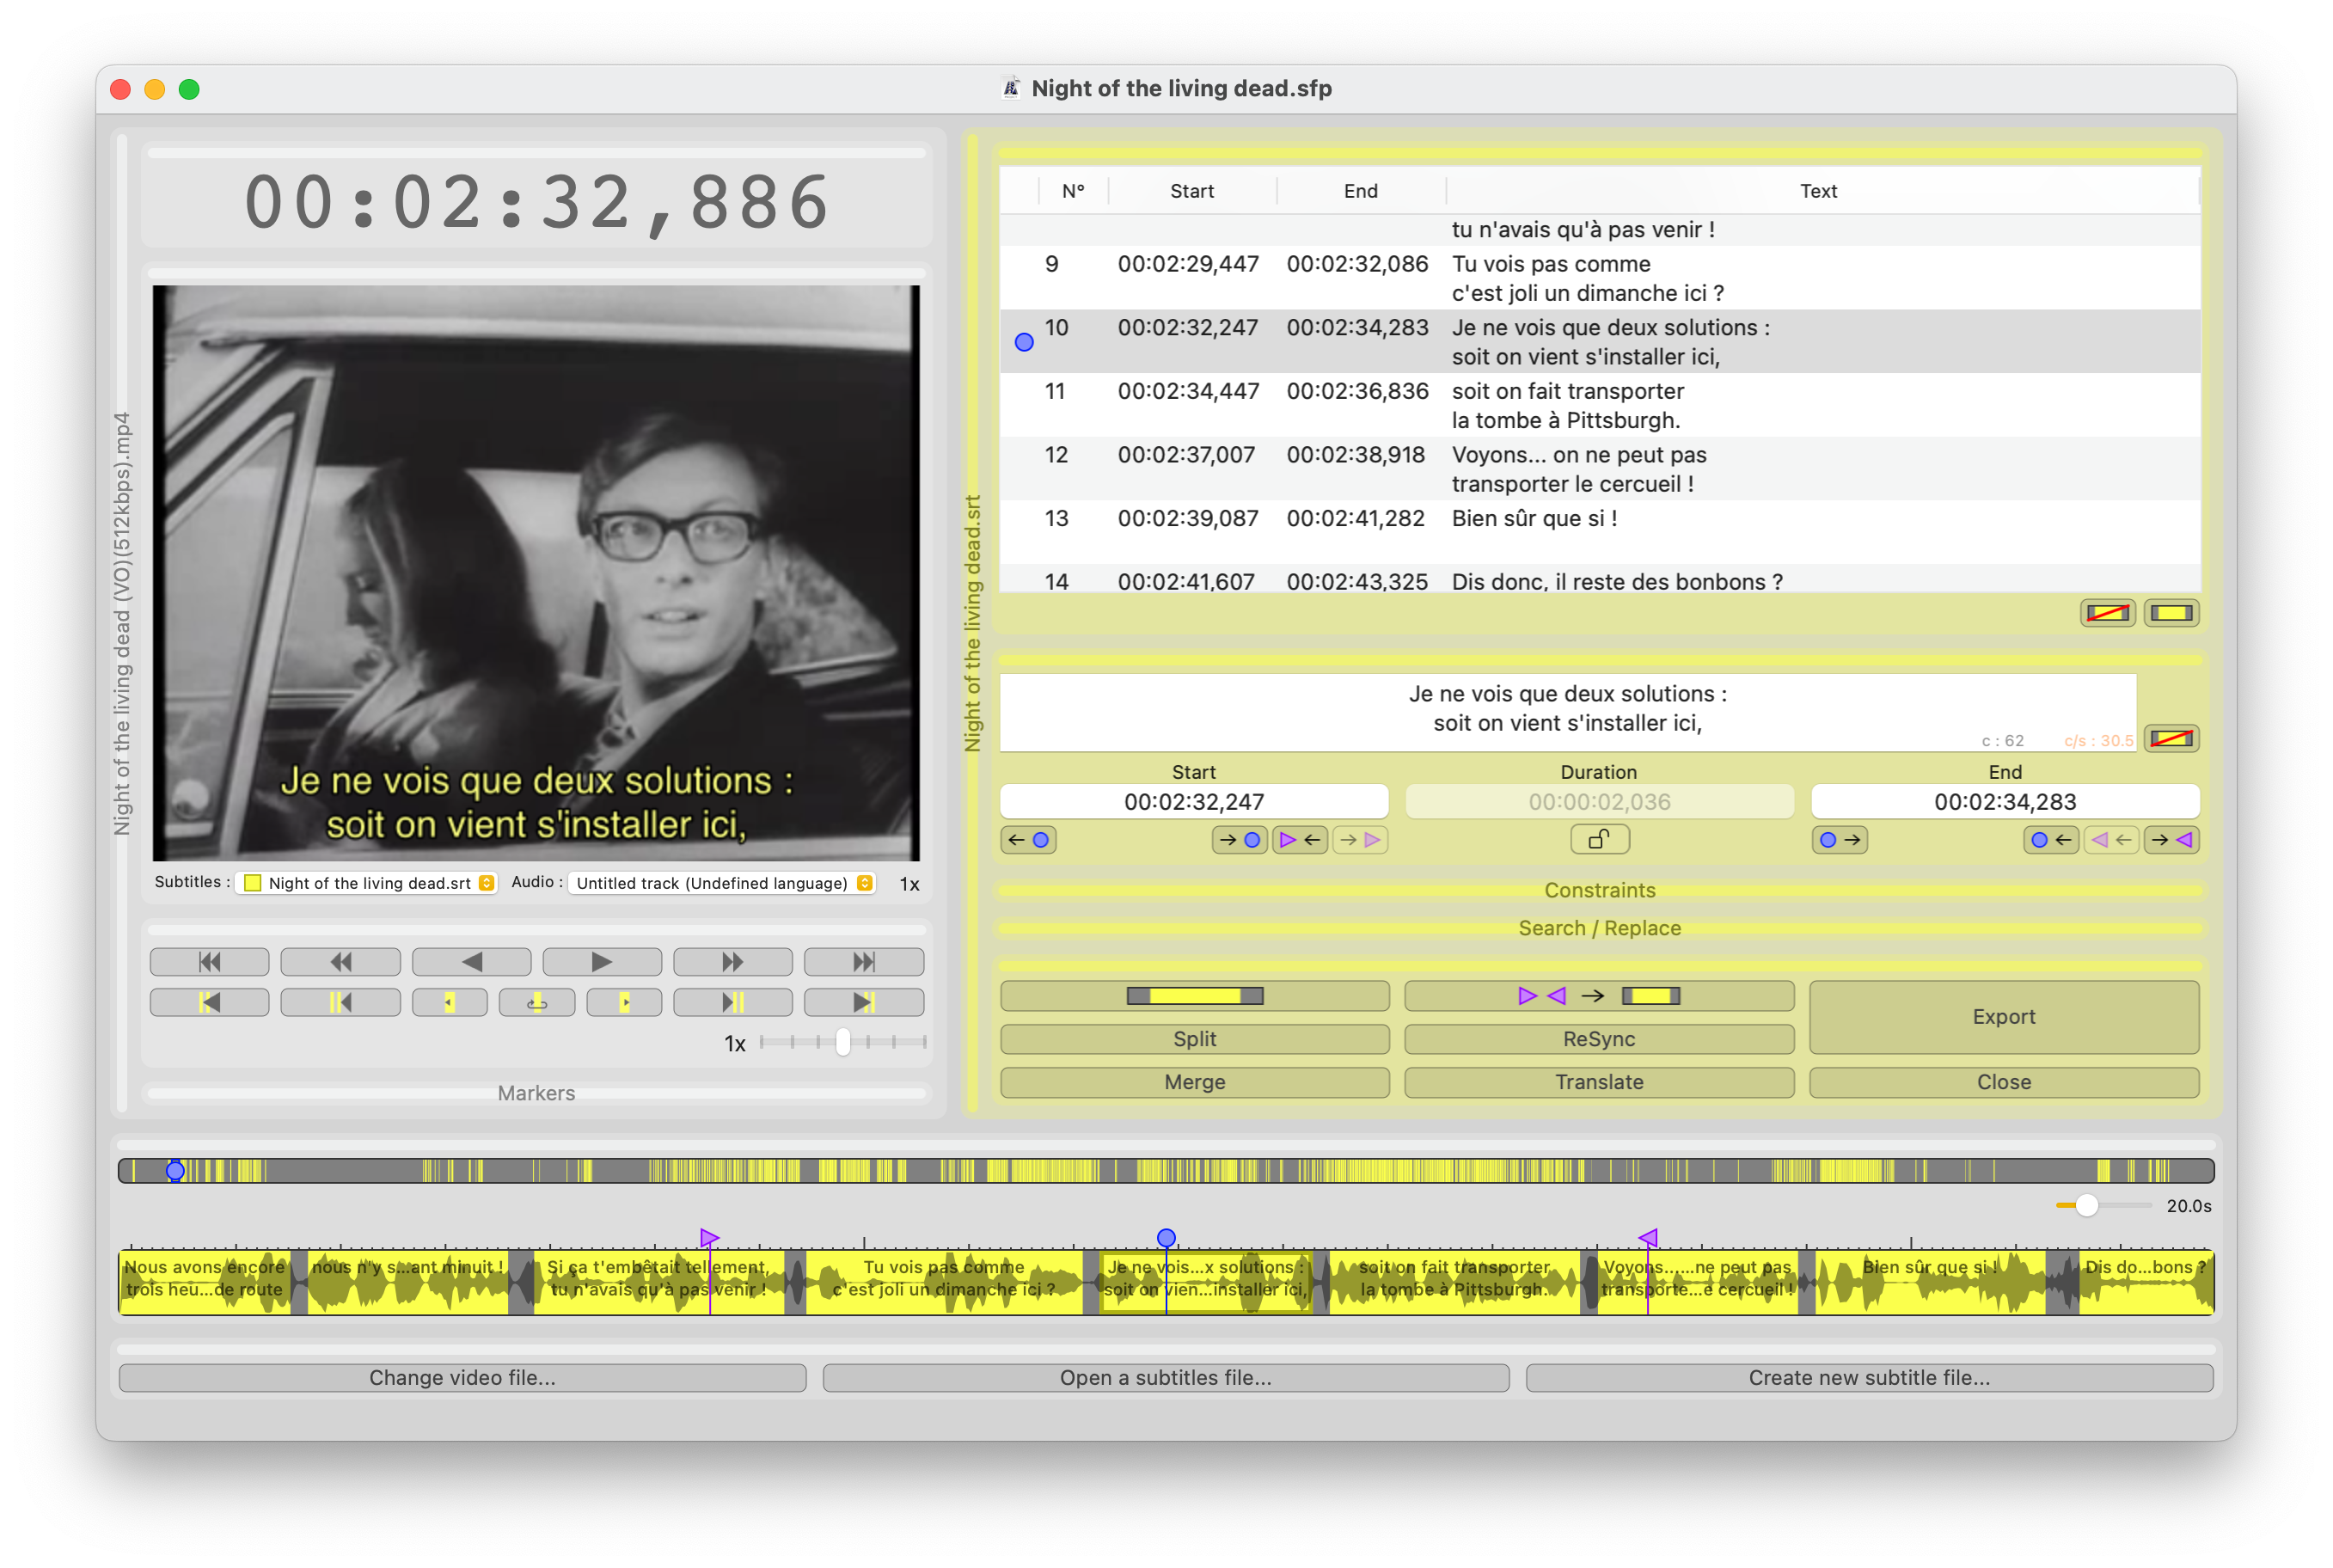
Palettes
A palette is a piece of interface allowing to group software functions that ought to be. Here is a palette :


There also are palette groups, aka columns. They have a vertical title bar. They can be folded just like palettes.
The palettes list is available in the "Palettes" menu, located in the menu bar.
Please note that the general palettes and those involving only video are colorless. Palettes about subtitle files are coloured (yellow for the first opened file). This allows you to distinguish them if you open several files in a single project (for example to make translations).
"Files" palette
This palette allows to load files in the current project.
The first button, "Open a video file", allows to load a video in the project. It can also be named "Change video" , in case there already is a loaded video. In this case, it will be replaced by the new one.
The second button, "Open subtitles...", allows to open a subtitle file (in .srt or .sub format for the time being) in the current project. It also allows to load a text file (.txt) in order to transform it into subtitles (see How to transform a text into subtitles).
The third button, "Creating new subtitles...", allows to create un new subtitle file within the project.

Several options are available in order to create that file :
- Create a empty file, containing no subtitle,
- Copy an existing file (to be chosen from the dropdown menu),
- Copy an existing file, but erase the subtitles content - therefore keeping only their timings. This option is for example usefull for traduction ;
- Split an existing file. The new file will then contain the subtitles end, while the selected file in the dropdown menu will contain the beginning .
To save this new subtitle file outside the project, use the "Export" or "Export as" button from the "actions" palette.
"Image" Palette
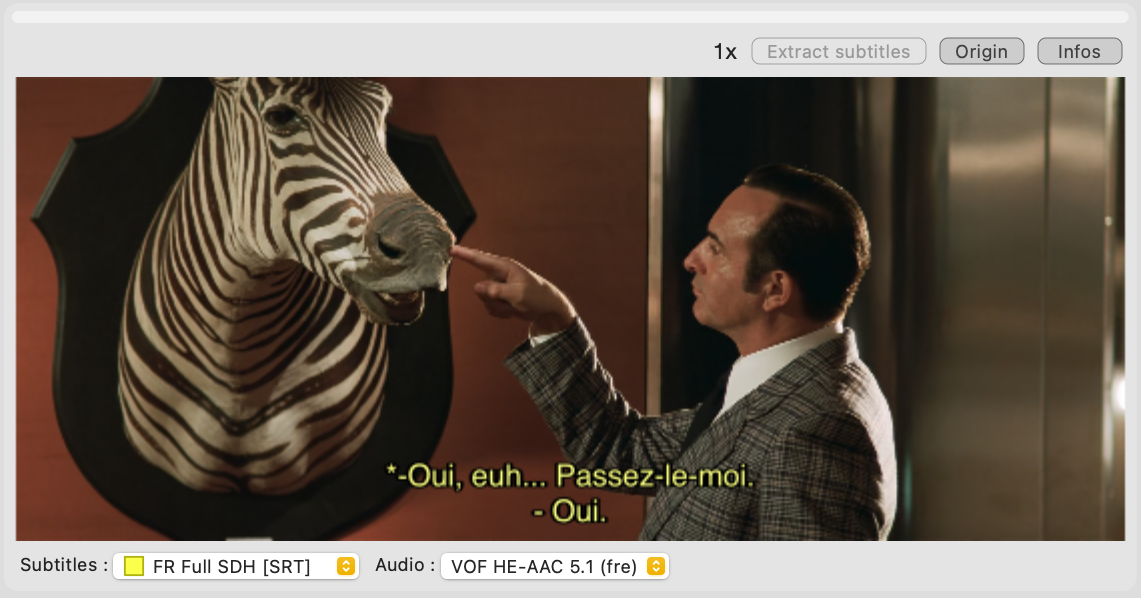
This palette simply shows the video on wich you are working. On the top, from left to right, are located :
- a text indicating the playing speed (1x is standard speed, 2x twice the standard speed, etc.)
- an "Extract subtitles" button. This button is only present if the video file contains a subtitles track (not burnt-in). It is active only if the selected subtitles track (via the bottom-left menu of this palette) is a track included in the video file. It allows to extract this track, in order to be able to work on it. More information can be found in the Extract subtitles from a video file page.
- an "Origin" button, allowing to choose the timing of the video beginning. Its use is described in the Tips and tricks page.
- an "Infos" button, allowing to display informations on the opened video file, particularly the list of its tracks. To close the popup, just click on the button again.
The bottom left menu allows to select the subtitle track to be displayed on the video. It only appears if there is a subtitle file opened and/or if the video file contains at least one subtitle track. When displayed, the menu contains :
- a "None" item, to display no subtitle,
- zero to several items corresponding to the subtitles tracks included in the video file,
- one item for each subtitle file opened in the project. These items show a color square to indicate which subtitle file they belong to (for example, yellow for the first subtitle file opened).
The other menus allow to select, the audio or video track to be played. To mute the audio, just select "None" for the audio track. The video track menu only appears if there are more than one video track. Multiple tracks are used, for example, when one video file contains several audio languages.
This palette only appears if you opened a video in the current Subs Factory project.
"Controls" palette
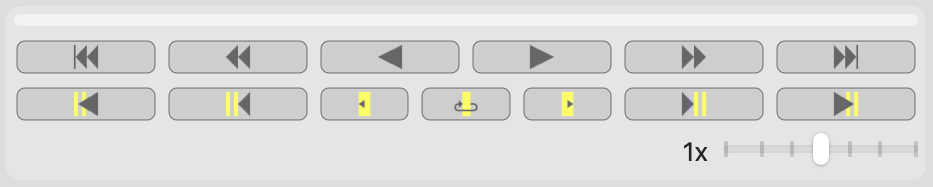
Here is the meaning of the symbols on the buttons of this palette :
 : play the video,
 : stop the video,
 : play the video backwards,
 /
/  :
go the beginning/end of the project. The project end
is the end of the video or the end of the last
subtitle, depending on which is last,
:
go the beginning/end of the project. The project end
is the end of the video or the end of the last
subtitle, depending on which is last,
 /
/  :
move forward / backward of the duration defined in preferences (3 seconds by default),
:
move forward / backward of the duration defined in preferences (3 seconds by default),
 /
/  : go to
the beginning / end of the current subtitle,
: go to
the beginning / end of the current subtitle,
 /
/  :
go to the previous / following subtitle,
:
go to the previous / following subtitle,
 /
/  : go
to the first / last subtitle.
: go
to the first / last subtitle.
 /
/  :
activate or deactivate looping on current (or next) subtitle / exit current loop (displayed instead of when loop is active).
:
activate or deactivate looping on current (or next) subtitle / exit current loop (displayed instead of when loop is active).
In the second line of controls, colored rectangles represent subtitles. Their color shows, when there are multiple subtitle tracks in the project, the selected track will be used as a reference for these actions. The controls then display its color.
The slider in the bottom right palette corner allows to change the video playing speed. This allows to move more precisely ore quicker in the latter. To come back to normal speed, move it to the middle (1x).
"Timeline" palette

Timeline description
This palette shows two timelines. The first, on the top, represents the entire project : the beginning is on the left and the end on the right. The blue cursor represents the current timing. It can be moved with the mouse.
The subtitles are colored on the grey background. Their color depends on the file they belong to. The subtitle being edited is highlighted with a border.
The violated constraints also appear if you wish so (check box "Show constraints violations" from "Constraints" palette). They are represented by coloured triangles. An horizontal bar of the same color represents the duration on wich they apply. Their color depends on their importance (see theConstraints help).
The second timeline, on the bottom, is called the detailed timeline, and represents in the same way the project's part around the current timing, as a "zoom" of the top part, around the cursor. The zoom level can be changed with the slider on the right between the parts.
In this second timeline, audio waveforms are also displayed. They represent the sound graphically. They can help precisely positioning subtitles beginnings and ends.
You can choose wether or not display audio waveforms in the preferences.
Audio waveforms may not appear right away when the video is opened, because they must be computed. They appear as computation progress. This computation may significantly increase CPU usage.
This part can also display subtitles text. The same way, it can be hidden via the preferences
Interact with timeline
The detailed timeline also allows to interact simply with its components :
- drag blue cursor (or click anywhere in the background) to change current timing,
- drag a marker to move it,
- drag a subtitle (by the middle) to move it,
- drag beginning or end of a subtitle to change its duration,
- double-click on a subtitle to edit it,
- click and drag on the timeline while pressing option (⌥) key background to create a new subtitle, and
- click on a subtitle while pressing option (⌥) key to delete it.
You can also simply use your trackpad (with two fingers) or your mouse scroll wheel while your cursor is over a timeline to move in time.
"Counter" palette

This counter simply shows the current temporal position (current timing) in the project, in the format specified in the preferences.
You can edit the counter (only when the video is paused) to go to a precise timing, or use your trackpad (with two fingers) or your mouse scroll wheel while your cursor is over this palette to change the counter value.
"Subtitle edition" palette
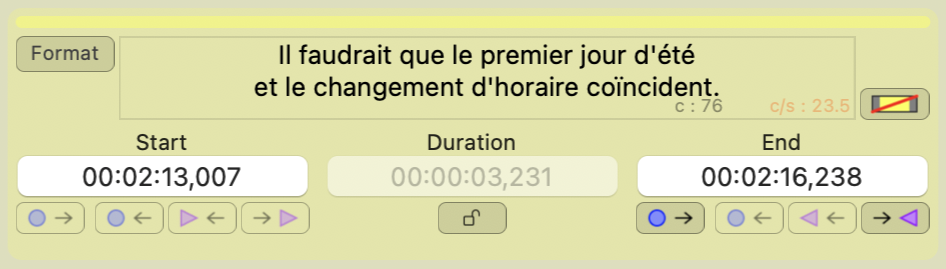
This palette allows to edit the current subtitle.
This palette only shows up if you open or create a subtitle file in the current Subs Factory project.
The main text field, in the top left, allows to edit the subtitle text. The three fields "beginning", "duration" and "end" located below allows to choose respectively the subtitle start timing, duration and end timing. These must be recorded with the format chosen in the preferences.
The padlock  allows to determine the subtitle duration. When
it's locked, if the beginning or the end of the subtitle is changed, the whole subtitle will be moved. Its
duration will not change. If it stays open, then only the beginning or the end will be moved. The duration will
then be modified.
allows to determine the subtitle duration. When
it's locked, if the beginning or the end of the subtitle is changed, the whole subtitle will be moved. Its
duration will not change. If it stays open, then only the beginning or the end will be moved. The duration will
then be modified.
The buttons located underneath the beginning timing field allows to move this beginning to the previous beginning
marker( ) or the next one (
 ).
Ditto to move the subtitle end to the previous end marker(
).
Ditto to move the subtitle end to the previous end marker( ) or the next
one (
) or the next
one ( ). You can also change these timings, not with
markers, but with the playback cursor, with the
). You can also change these timings, not with
markers, but with the playback cursor, with the  and
and
 buttons. Finally, the
  and
and  buttons allow to be moved in the video up to the
value displayed above.
buttons allow to be moved in the video up to the
value displayed above.
These buttons change their icons or are enabled according to what is possible in this context.
The  button, located to the right of the main text
field, allows to delete the subtitle.
button, located to the right of the main text
field, allows to delete the subtitle.
The "Format" button, located to the left of the main text field, displays a popover in which you can choose the text format (font, size, color, italic, bold,...). Beware, these attributes might be omitted when exporting the file, depending on the file format chosen.
This palette also shows, if you ticked it in the constraints palette, the constraints violated by the current
subtitle. If several constraints are violated, you can navigate between them thanks to the
 button.
If several subtitles are superimposed at the current timing, you can navigate between them thanks to the button then displayed in the top right. At its left, the number of
superimposed subtitles at the current time is displayed in red.
You will also notice, on the bottom right of the subtitle text edition field, two numbers indicated by "c" and
"c/s".
They represent the count of characters (including invisible ones, except on extremities) and the number of
characters per second of the subtitle. They allow to check that the subtitle remains visible long enough to be
read correctly.
The number of characters per second will change color if it gets higher than the maximum allowed, defined
in the "Maximum number of characters per second" constraint. You can change this maximum value to adapt it to
your requirements, or to the subtitles language.
"Subtitles table" palette
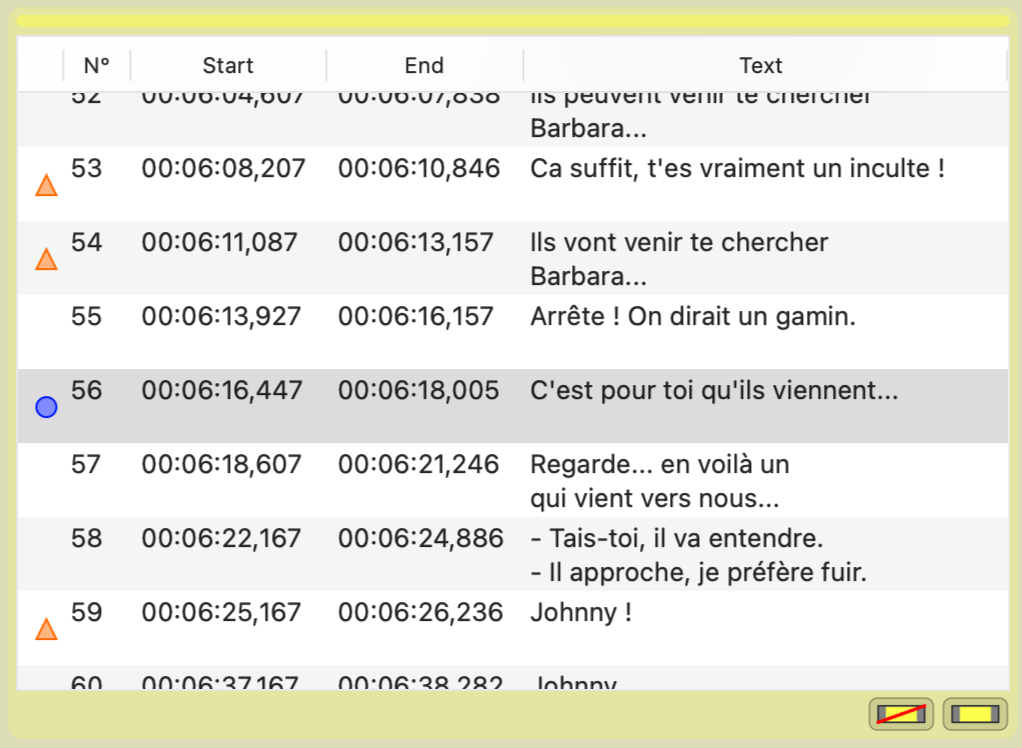
In this table appear all the subtitles corresponding to the palette's corresponding file. They are sorted thanks to their beginning timing, and then with their end timing.
You can modify their beginning timing or their end timing, as well as their text, by double clicking on one of these values. Note that the timings should be entered respecting the format defined in preferences.
A single click on one of the subtitles will move the current timing (the video timing) to its beginning.
Facing each subtitle can appear the blue round cursor. This means that the subtitle is shown at the current timing. At the same place, if you ticked it in the "constraints" palette, a little triangle can appear if the subtitle violates one or several constraints.
The button, located under the table, allows to delete
the selected subtitle; while the  button allows to add a
subtitle.
button allows to add a
subtitle.
"Actions" palette
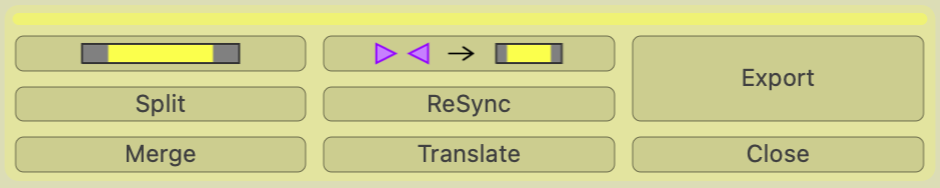
The button allows to add a subtitle at the
current timing. The new subtitle will respect constraints as much as possible,
and
its default length can be set in preferences.
The  button allows to
tranform each couple of markers [
button allows to
tranform each couple of markers [ puis
puis
 ] into one subtitle. The used markers will then be deleted.
The "Resynchronize" button allows to show the resynchronize window. To know how to use it, consult the page "Resynchronize the subtitles".
The "Merge" button allows to show the window to merge two subtitles files. To know how to use it, consult the "Merge two subtitle files" page.
The "Split" button allows to show he window to split a subtitle file. To know how to use it, consult the"Split a subtitle file" page.
The "hide" button allows to fold all the palettes linked to this subtitles file, to free some space in the workspace.
The "Export..." button allows to save only the subtitle file to the .srt format. You will then be asked where to save the .srt file.
The "close" button allows to close the subtitle file to which this palette is linked. It will then not be a part of the project anymore. A confirmation will be requested if you did not export the file before, in order not to lose your work.
"Markers" palette
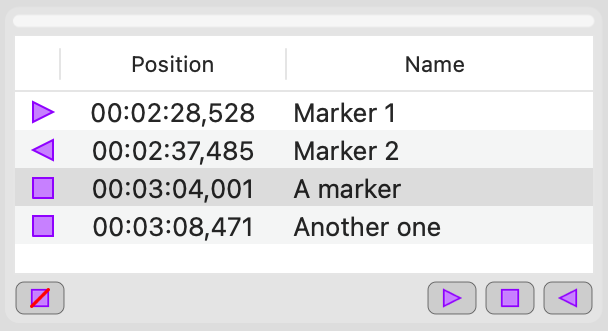
This palette contains the list of all the project markers. The type of each marker is shown in the first table
column : for beginning markers,
for end markers, and  for undifferentiated markers.
You can modify the timing of each marker by double clicking on the corresponding value (it has to respect the format defined in preferences). You can give them a name in the same way.
The three buttons in the bottom right ,
, and allows to place a
marker at the current timing (respectively a marker of subtitle beginning, undifferentiated, and subtitle end).
The "Markers" menu allows to do the same thing. It allows in particular to place beginning and end markers with the I and O keyboard keys (for in and out). Useful to place the markers while playing a video, in order to transform them into subtitles (see "Subtitle a video" page).
The bottom left button with the red crossed marker, allows to delete the selected marker.
"Constraints" palette
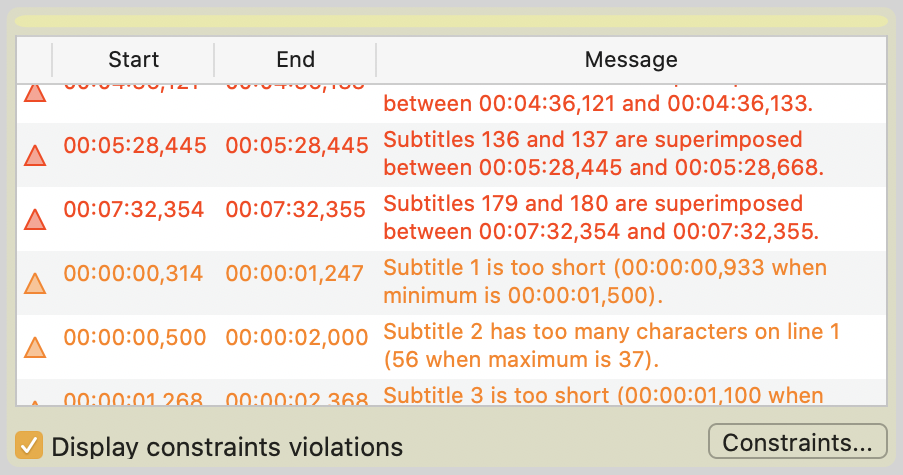
This palette contains the list of all constraints violations. Their color show their importance. You can sort them by importance, beginning timing, end timing or message by clicking on table headers.
The "Constraints" button allows to adjust the applicable constraints for this subtitle file in this project.
The checkbox "Display constraints violations" activates constraints violations display in other palettes (timeline and subtitle editing).
To know more about constraints, see "Constraints" page.
"Search / Replace" palette
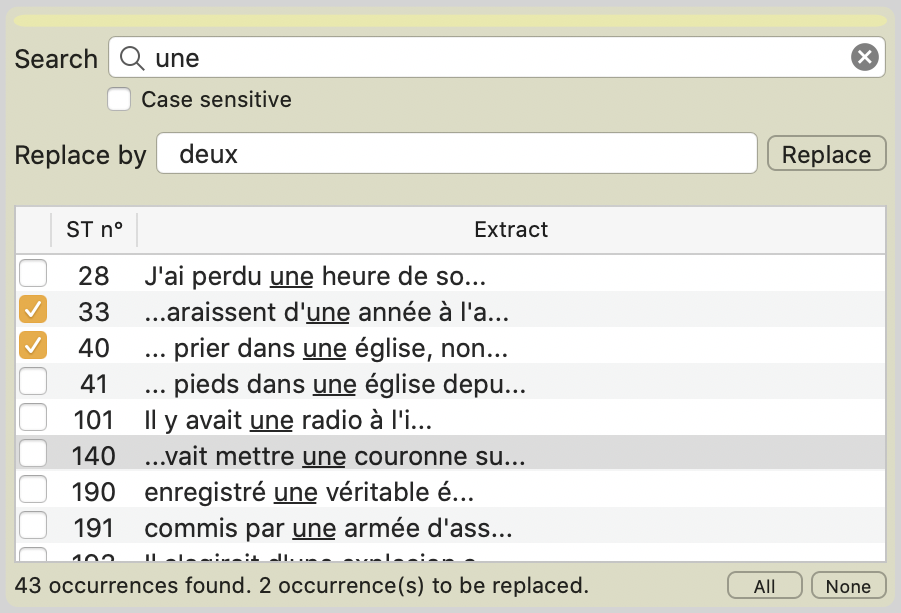
This palette allows to search text amongst the subtitles, and then to replace it.
Start by typing the searched text in the first field, "Search". In the above list will appear the occurences found. The second column contains the number of the subtitle containing the text. The third column contains an extract of the subtitle, where the text found is underlined. If the searched text appears several times in one subtitle, then as many lines will be displayed, one per occurrence. Click on a line to go to the subtitle.
If you want to replace the found occurences by another text, type it in the second field, "Replace by". Then, check in the table first column the occurences you would like to replace. The "All" and "None" buttons allows you to quickly check or uncheck all the occurences. Finally, click on the "Replace" button.